Curtain walls are non-load bearing glazing systems which span between multiple connections back to the primary building structure typically at each floor/level. Typically, such glazing systems (i.e., frame + glass + opaque “spandrel” panels) provide for movement at or near each anchor/floor/level, and are engineered for project-specific applications, and structural, thermal, and potential future environmental loads.
Whether a specific system was designed to be assembled piece-by-piece (“stick-built”), use pre-attached components (“semi-unitized”), or use pre-assembled panels (“unitized”) to reduce installation time, most curtain walls are positioned just in front of the structural members from which they are typically suspended (like actual curtains). In addition to creating a desirable material aesthetic, another core function that curtain walls perform is establishing control layers to manage and/or block the free exfiltration and infiltration of air, vapor, and water that would otherwise occur.
When investigating active leakage conditions, adopting a systematic approach to evaluation is essential. This is especially important for curtain walls and related glazing types, such as ladder systems, linear window-wall systems, and local ”punched” windows, that also rely on pre-assembly and attempt to minimize field-applied glazing sealant. Such products incorporate many layered, system-specific assumptions, technical design and detailing choices, and specialized components or subassemblies that can complicate repairs and exacerbate leakage if not adequately considered (even if correctly installed and maintained over time).
To increase the chances of success in your curtain-wall leak investigation, maintenance, restoration, or other troubleshooting campaign, consider implementing some version of the following steps:
1. Document all symptoms to identify defects and isolate problems in the curtain wall system
This activity should principally occur during the initial investigation stage and may be expedited by conducting detailed tenant interviews. It should be treated as an ongoing campaign to the point of resolution of all leakage. The investigation should include asking the building management company or Board for a whole-building leak list that identifies specific active leakage locations as well as any available historic data relevant to previous water infiltration issues and their resolution.
Additionally, reviewing system-specific maintenance logs and providing tenants with as much information as possible during the investigation process can yield additional system performance insights, facilitate technical review, and serve remedial scope development. General questions related to leakage occurrences include: where is the observed leak coming from? How frequently and how long has the observed leak been occurring? Are there any notable changes in the frequency or magnitude of leakage? Any information pertaining to the locations and magnitude of leaks can be helpful in determining the origins and solutions to the existing defects.
2. Collect and review original architectural and technical design documentation for the curtain wall system
Locating original design documents, or Contract Documents (CD), including any milestone design drawings and specifications that describe and define the final architectural and technical intent, is critical to forming an accurate sense of whether there are any design deficiencies or installation errors. Milestone CD issuances, addenda, and other post-approval filings should contain detailed system-specific descriptions and performance criteria that clarify the final design intent or scope “owned.” Approved shop drawings and engineering documentation that was necessary or required to fabricate and install the system or award the scope may also contain important relevant modifications.
More often than not, and particularly with older buildings, complete design documentation is unavailable. However, more can be learned by contacting the architect, historical building department records, consultants, contractors, subcontractors, manufacturers/suppliers, and maintenance providers that were originally involved with or have been servicing the property.
3. Review final as-built and record technical documentation
The review of as-built shop drawings is also crucial to understanding any in-field design changes that may have occurred during construction. Other technical documentation, such as the contractor or subcontractor shop drawings, may contain additional information relative to the generalized architectural details or as-built drawings. If partial or otherwise pre-final architectural design documentation is all that is available, probing specific conditions to verify consistency with the actual current existing conditions may well be necessary or practical.
4. Document existing conditions of the curtain wall system
Periodic documentation and verification of the current conditions of all glazing and cladding systems are an important and necessary part of the maintenance process for any curtain wall assembly. Components such as glazing gaskets, perimeter weather seals, operable vent functionality, etc., should all be inspected on an annual basis to monitor the performance of the curtain wall system.
The first phase of a curtain wall investigation should include documentation of all leakage locations and the conditions of the curtain wall assembly adjacent to where interior water penetration was observed. These observations can then be categorized according to their origin(s) and related curtain wall components that require remediation. Patterns of the curtain wall component(s) failure will emerge, and a comprehensive repair program can be developed as part of this investigation.
5. Evaluate symptoms to identify probable and potential causes or defects related to the curtain wall leakage
Once the symptoms and existing conditions have been clarified to the fullest practical extent, the curtain wall system can be effectively evaluated for probable and potential causes of leakage and defects. The most common contributor(s) to curtain wall leakage conditions include the following:
A. Curtain wall internal joints
This refers to any joints that are internal to whatever scale of “unitized” panel or “stick-built” module can be attached using two (2) typical fixed and two (2) slipped connections. Many manufacturer-standard “stick systems” rely on installing zone dams in the vertical mullion glazing pockets to redirect water into the horizontal transoms. Once redirected, water is then distributed through drainage holes located in the pressure bars and exits through weep holes in the snap-on covers. However, neither the dams nor the holes are always present. The continuity of primary inner glazing gasket sealant is also critical to this approach. Evaluation of any curtain wall leakage condition that is occurring at mullion assembly joints should include confirming that all shear blocks, zone dams, and associated fasteners have been applied correctly and sealed to achieve glazing pocket continuity (Figure 1).
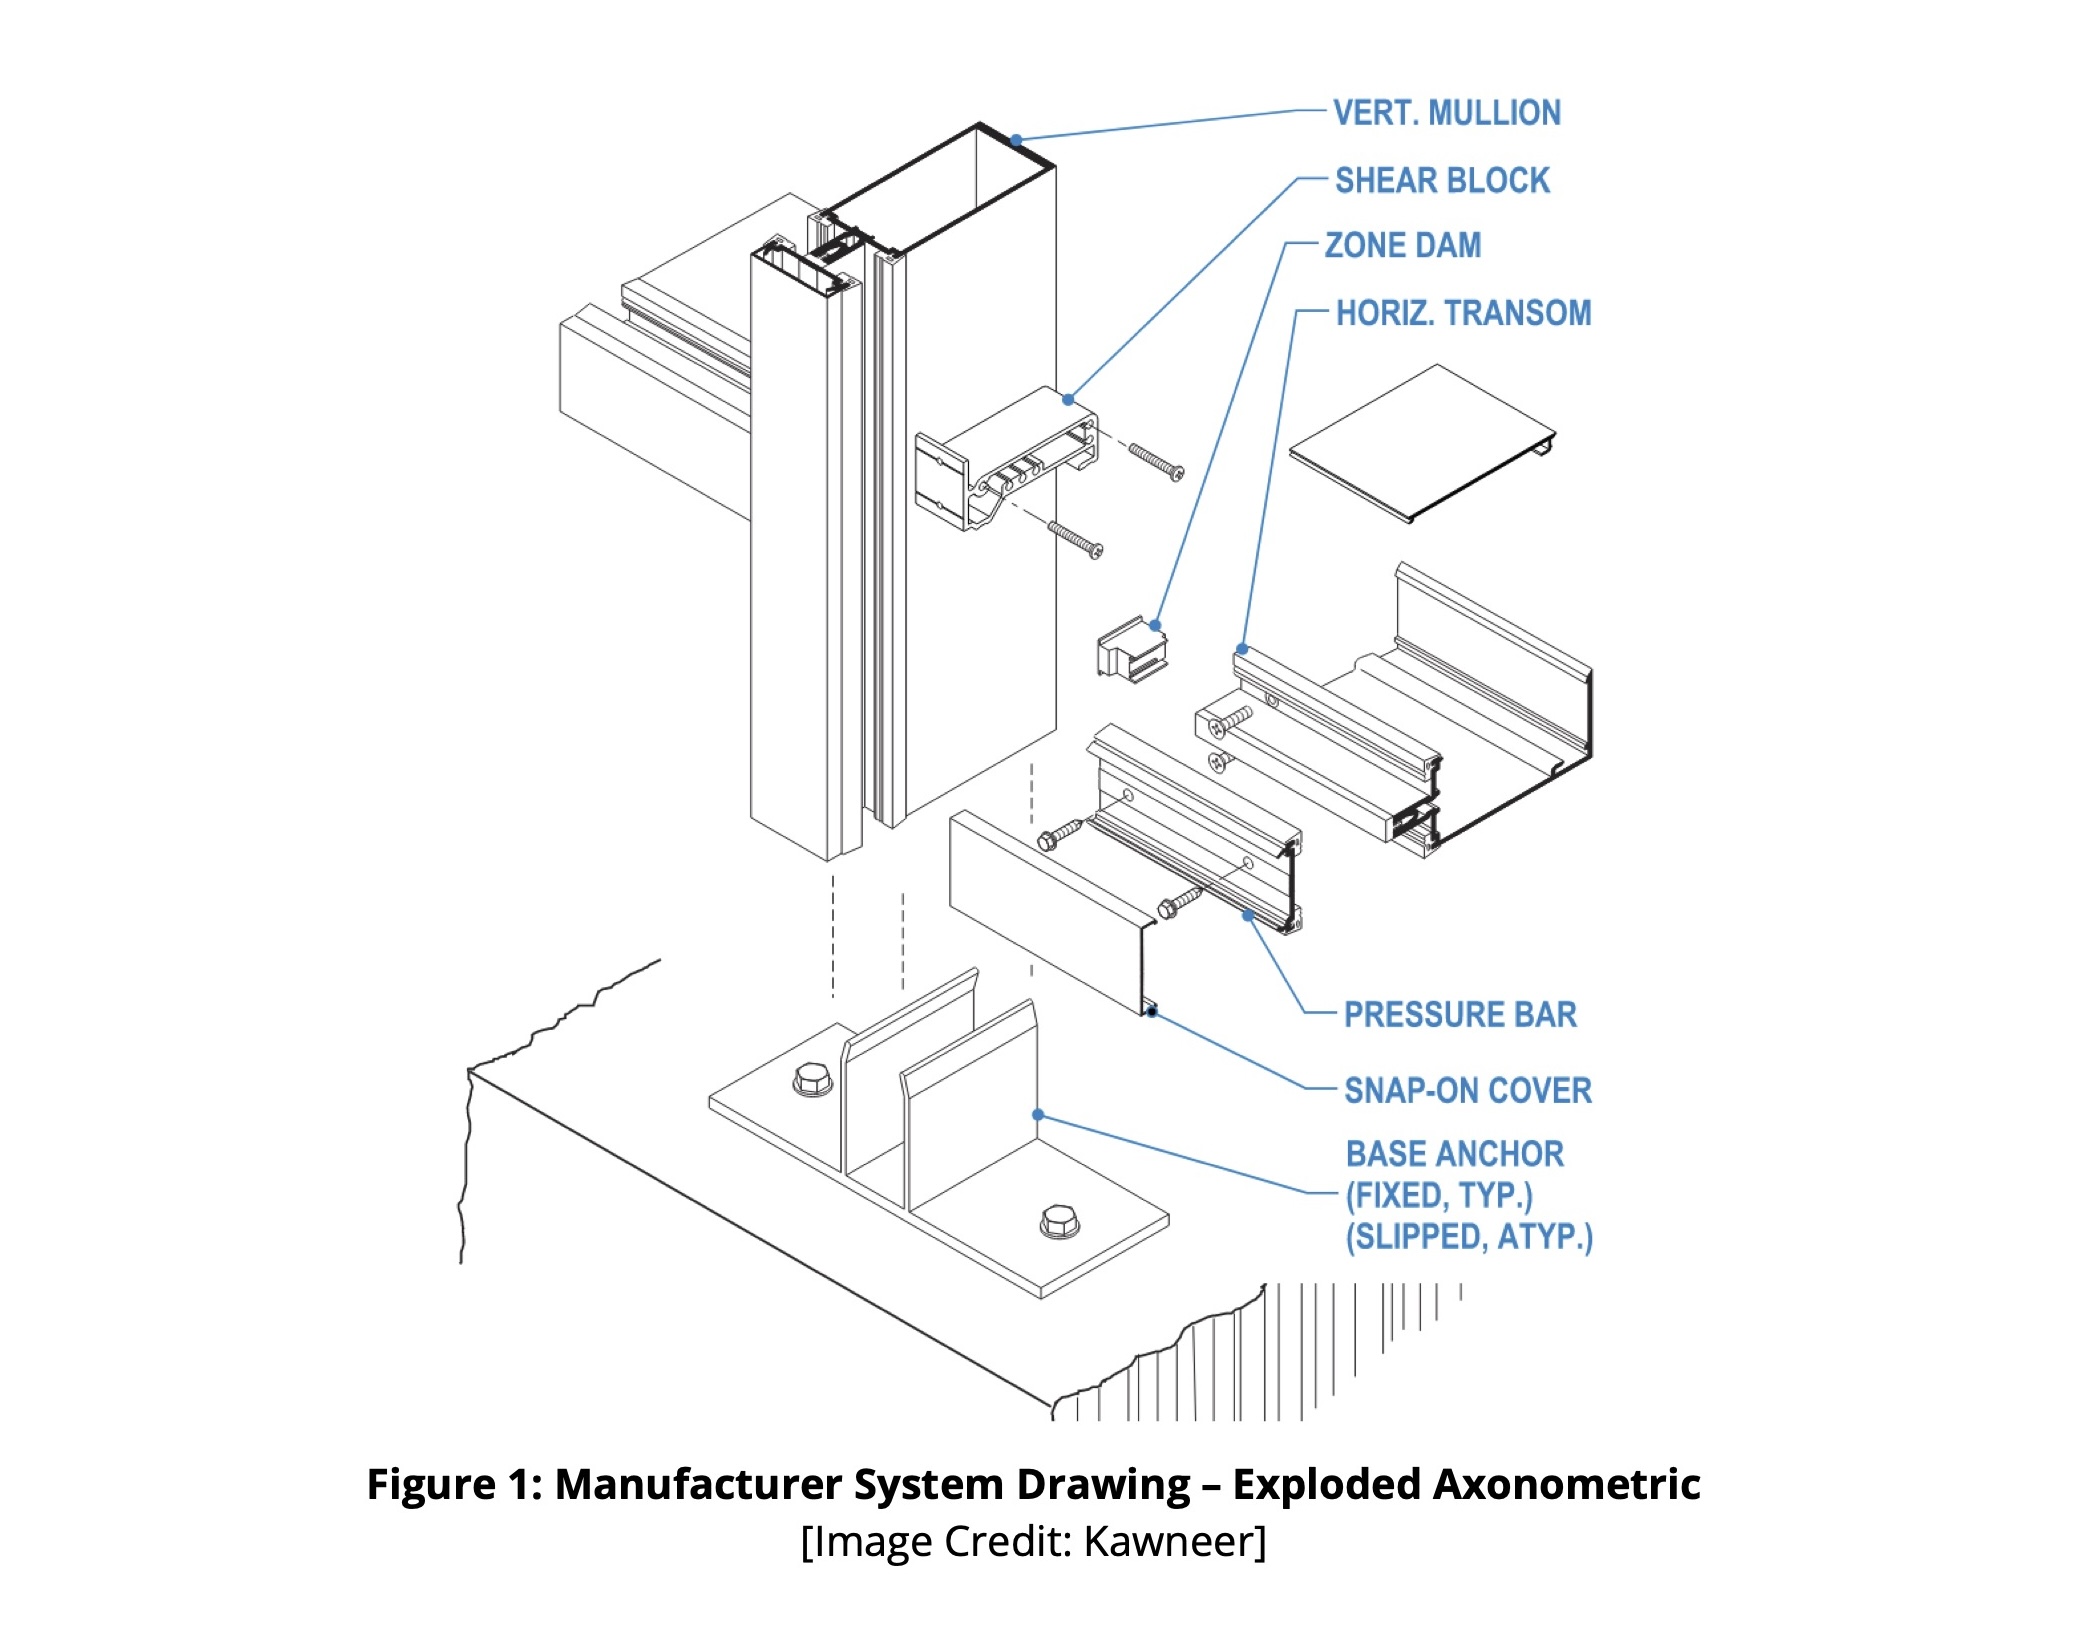
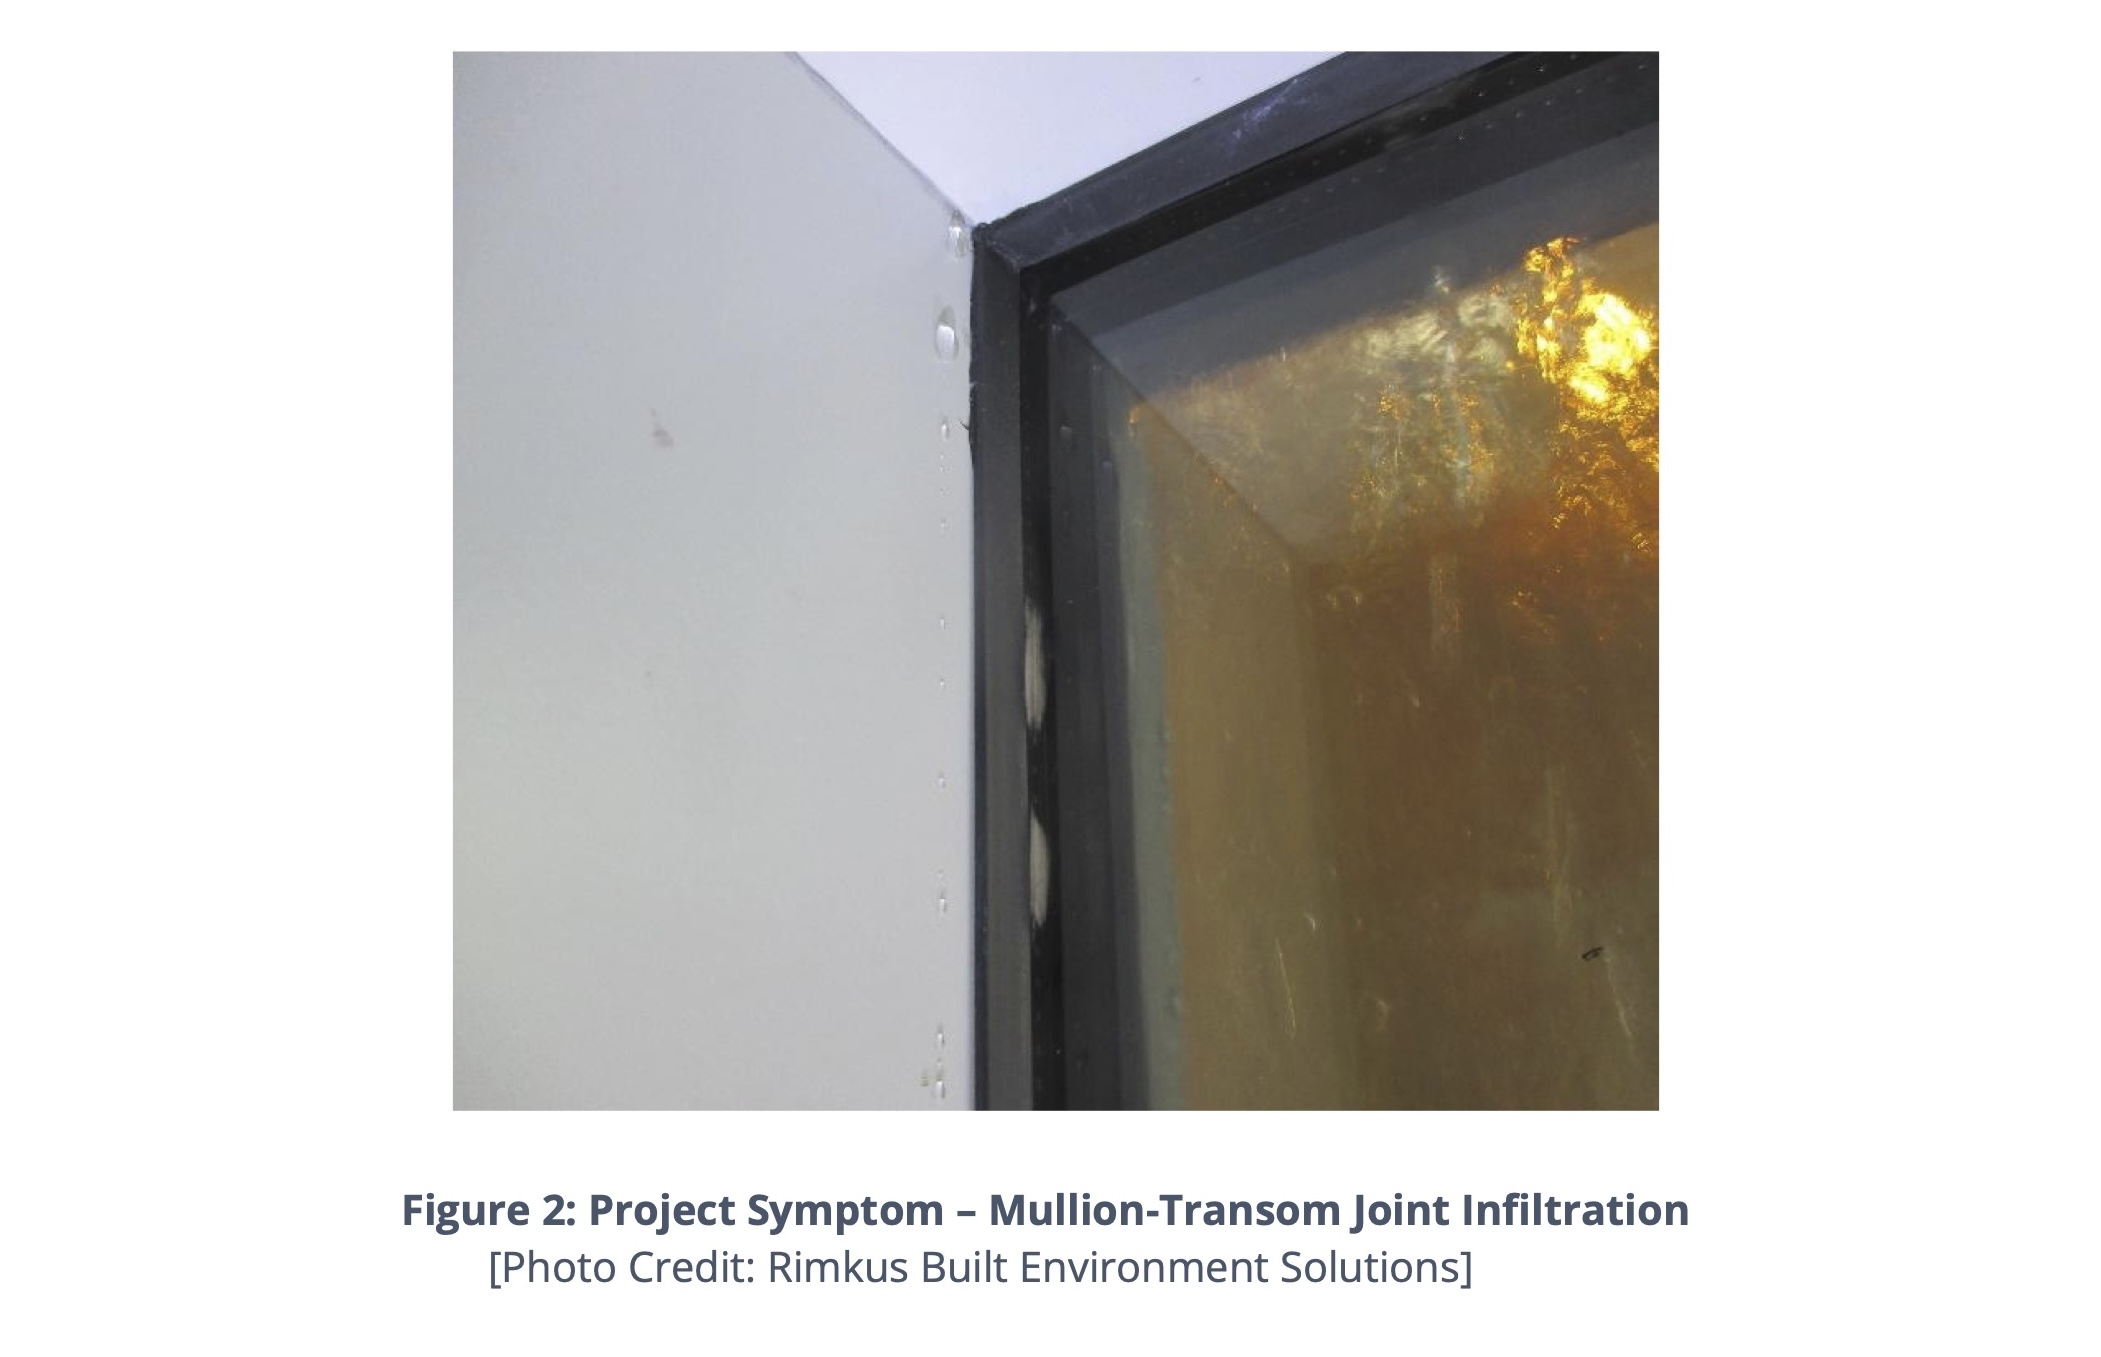
The following photograph shows avoidable leakage that occurred due to poor sealant workmanship at the shear blocks and in the glazing pocket at the vertical mullion to horizontal transom interface. Horizontal mullions should be fully bedded in sealant at the shear block connection to the vertical mullions. The glazing pockets of the horizontal mullions should then be sealed to the vertical mullion glazing pockets. In the case of the leakage condition below, not all water was redirected from the vertical mullion glazing pocket into the horizontal transom glazing pocket. Water should have been directed to concealed drainage holes in the pressure bars and exited through the visible weep holes in the snap-on caps/covers. Leakage occurred as excess sealant in the glazing pockets at the horizontal-to-vertical mullion glazing pockets impeded drainage, and water accumulated within the system and penetrated poorly sealed shear block assembly joints (Figure 2).
B. Perimeter gaskets, sealant, spandrel panels, and weep holes
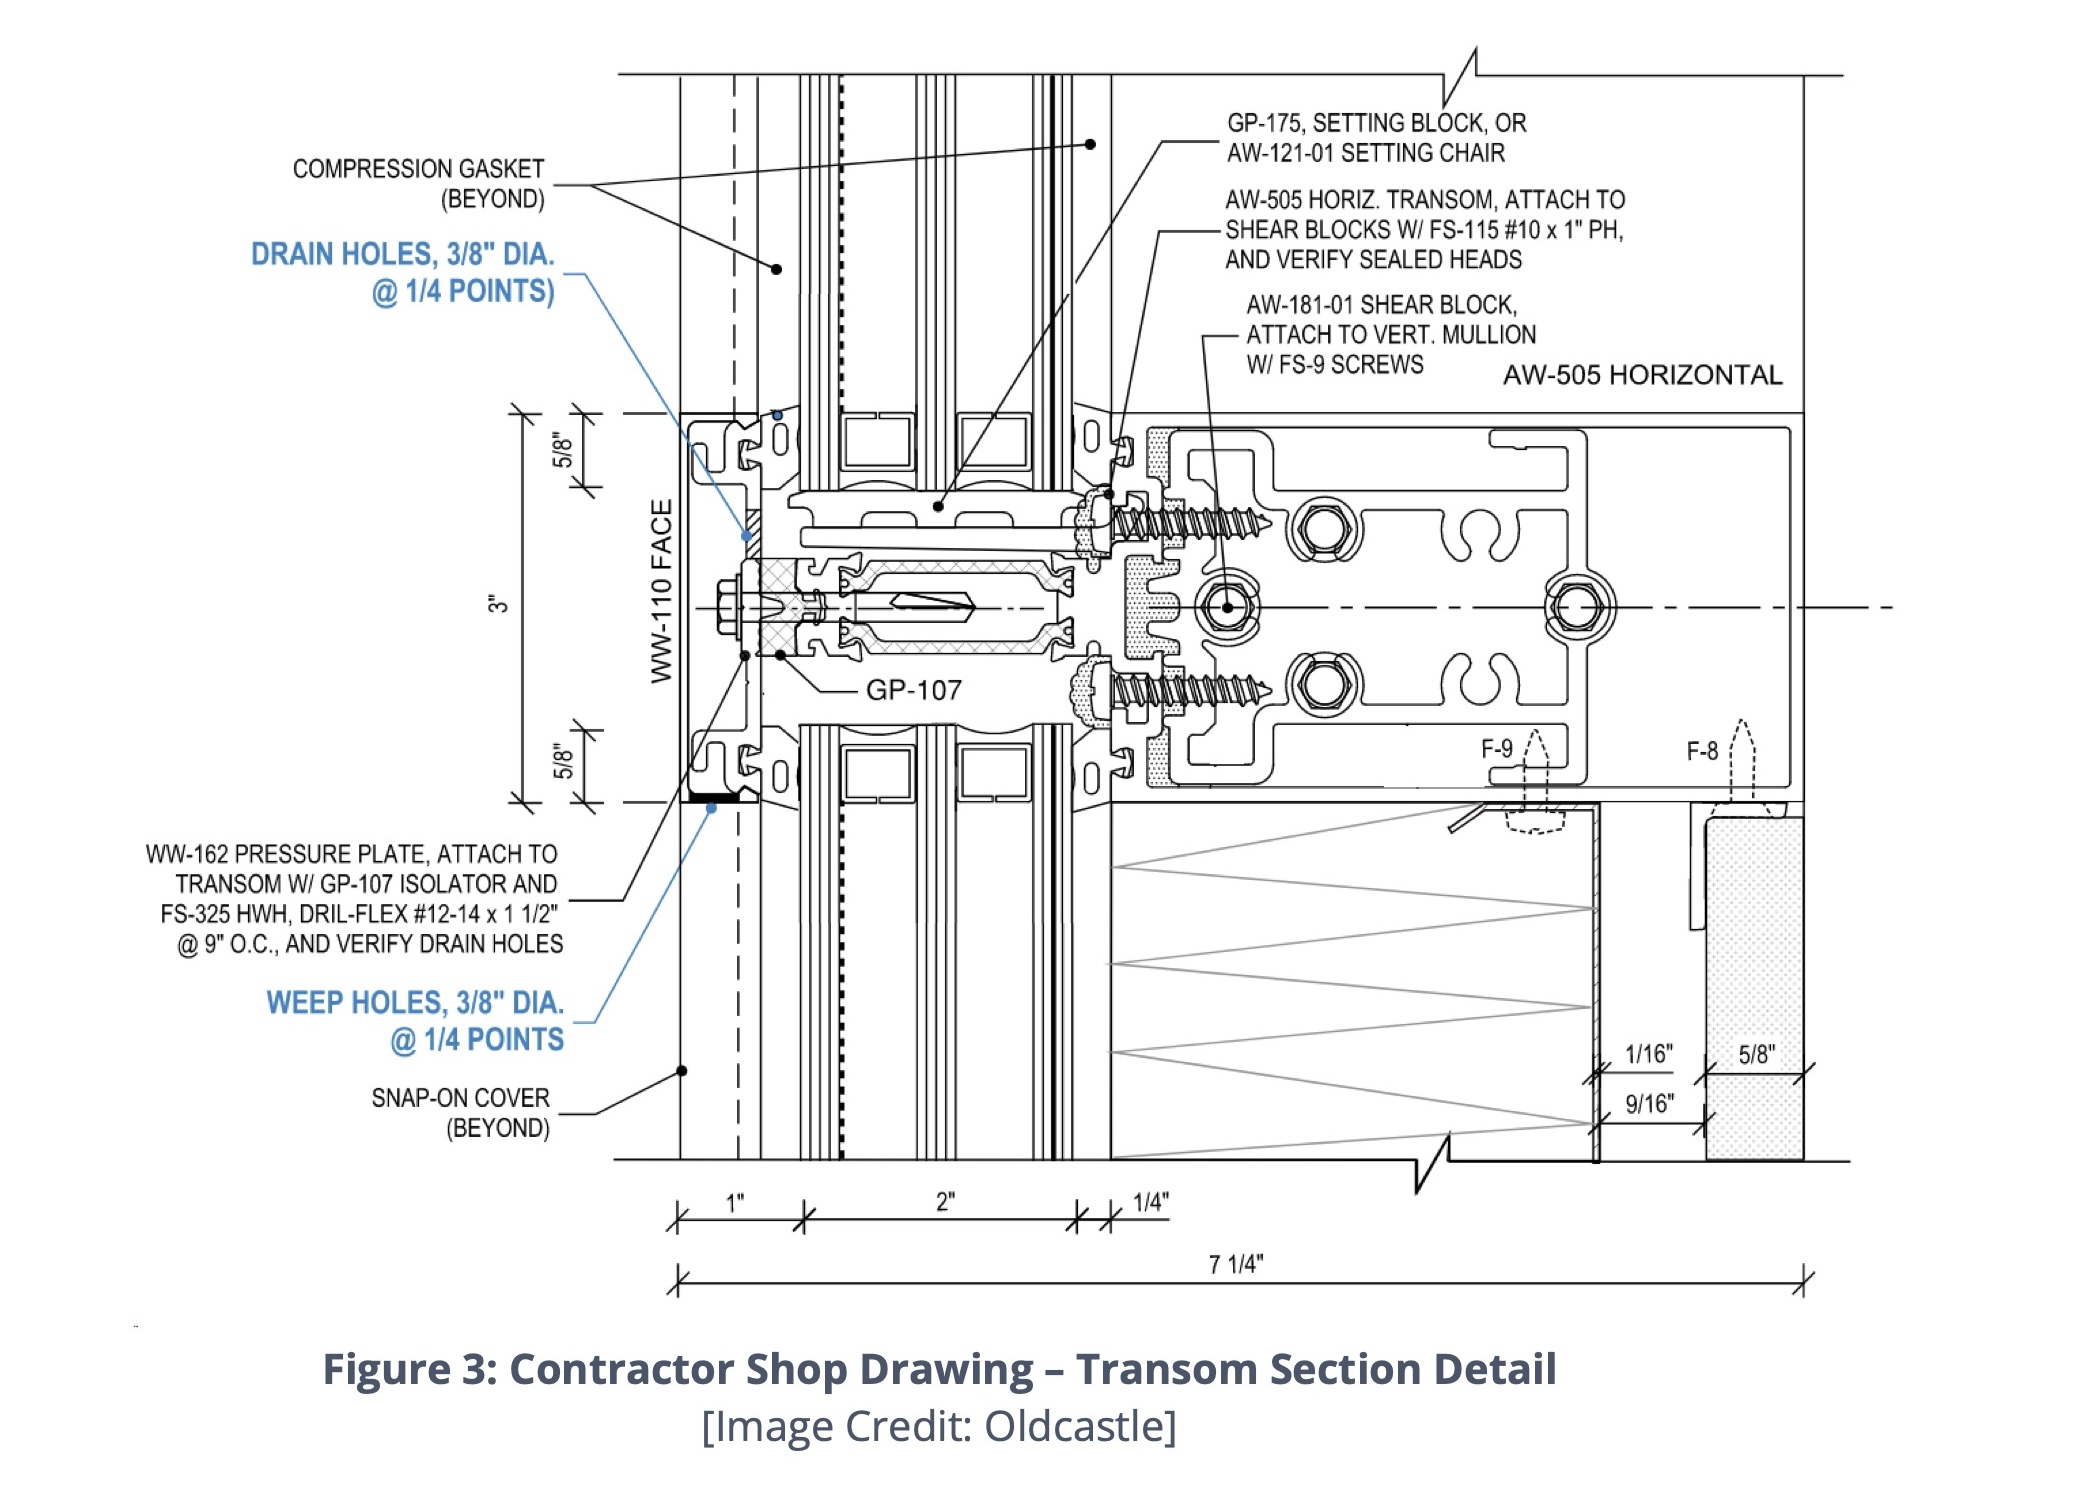
Glazing gaskets, sealants and glazing tape installed at the perimeter of insulating glass units, field-applied glazing pocket sealant, and secondary outer gasketed pressure bars with snap-on architectural caps/covers are all subject to installation workmanship and therefore do not always perform exactly as intended. Many common curtain wall systems have internal drainage holes in the horizontal transom pressure bars and caps, which manage any water that penetrates the secondary outer weather-barrier glazing gaskets. Damaged and deteriorated outer weather glazing gaskets allow for excessive water penetration into the glazing pockets and therefore exacerbate the potential for water penetration through internal curtain wall assembly joints. Over time, weep holes can become blocked/clogged with migrating surface dirt, wind-borne organic material, construction dust, and other debris. Slow drainage can cause water to accumulate within the system long enough for it to eventually find its way to other concealed defects or conditions where it can cause additional leakage (Figure 3).
C. Operable vents and windows
These are another common source of avoidable interior leakage. Often due to defects, discontinuities, or poor workmanship, these components can lead to poor long-term performance of gaskets or sealants. Operable vents usually rely on the installation of bulb-, flap-, or wedge-style gaskets between frame profiles and the concealed edges of insulating glass units (IGUs) for air infiltration and water penetration resistance. The performance of these gaskets is heavily contingent upon the workmanship of the installation of the gaskets at the manufacturer’s facility and the installation of the operable sash vent in the field. Gaskets must be properly installed in the window and operable sash frames, ensuring that splice joints are heat-welded or sealed depending on the gasket material.
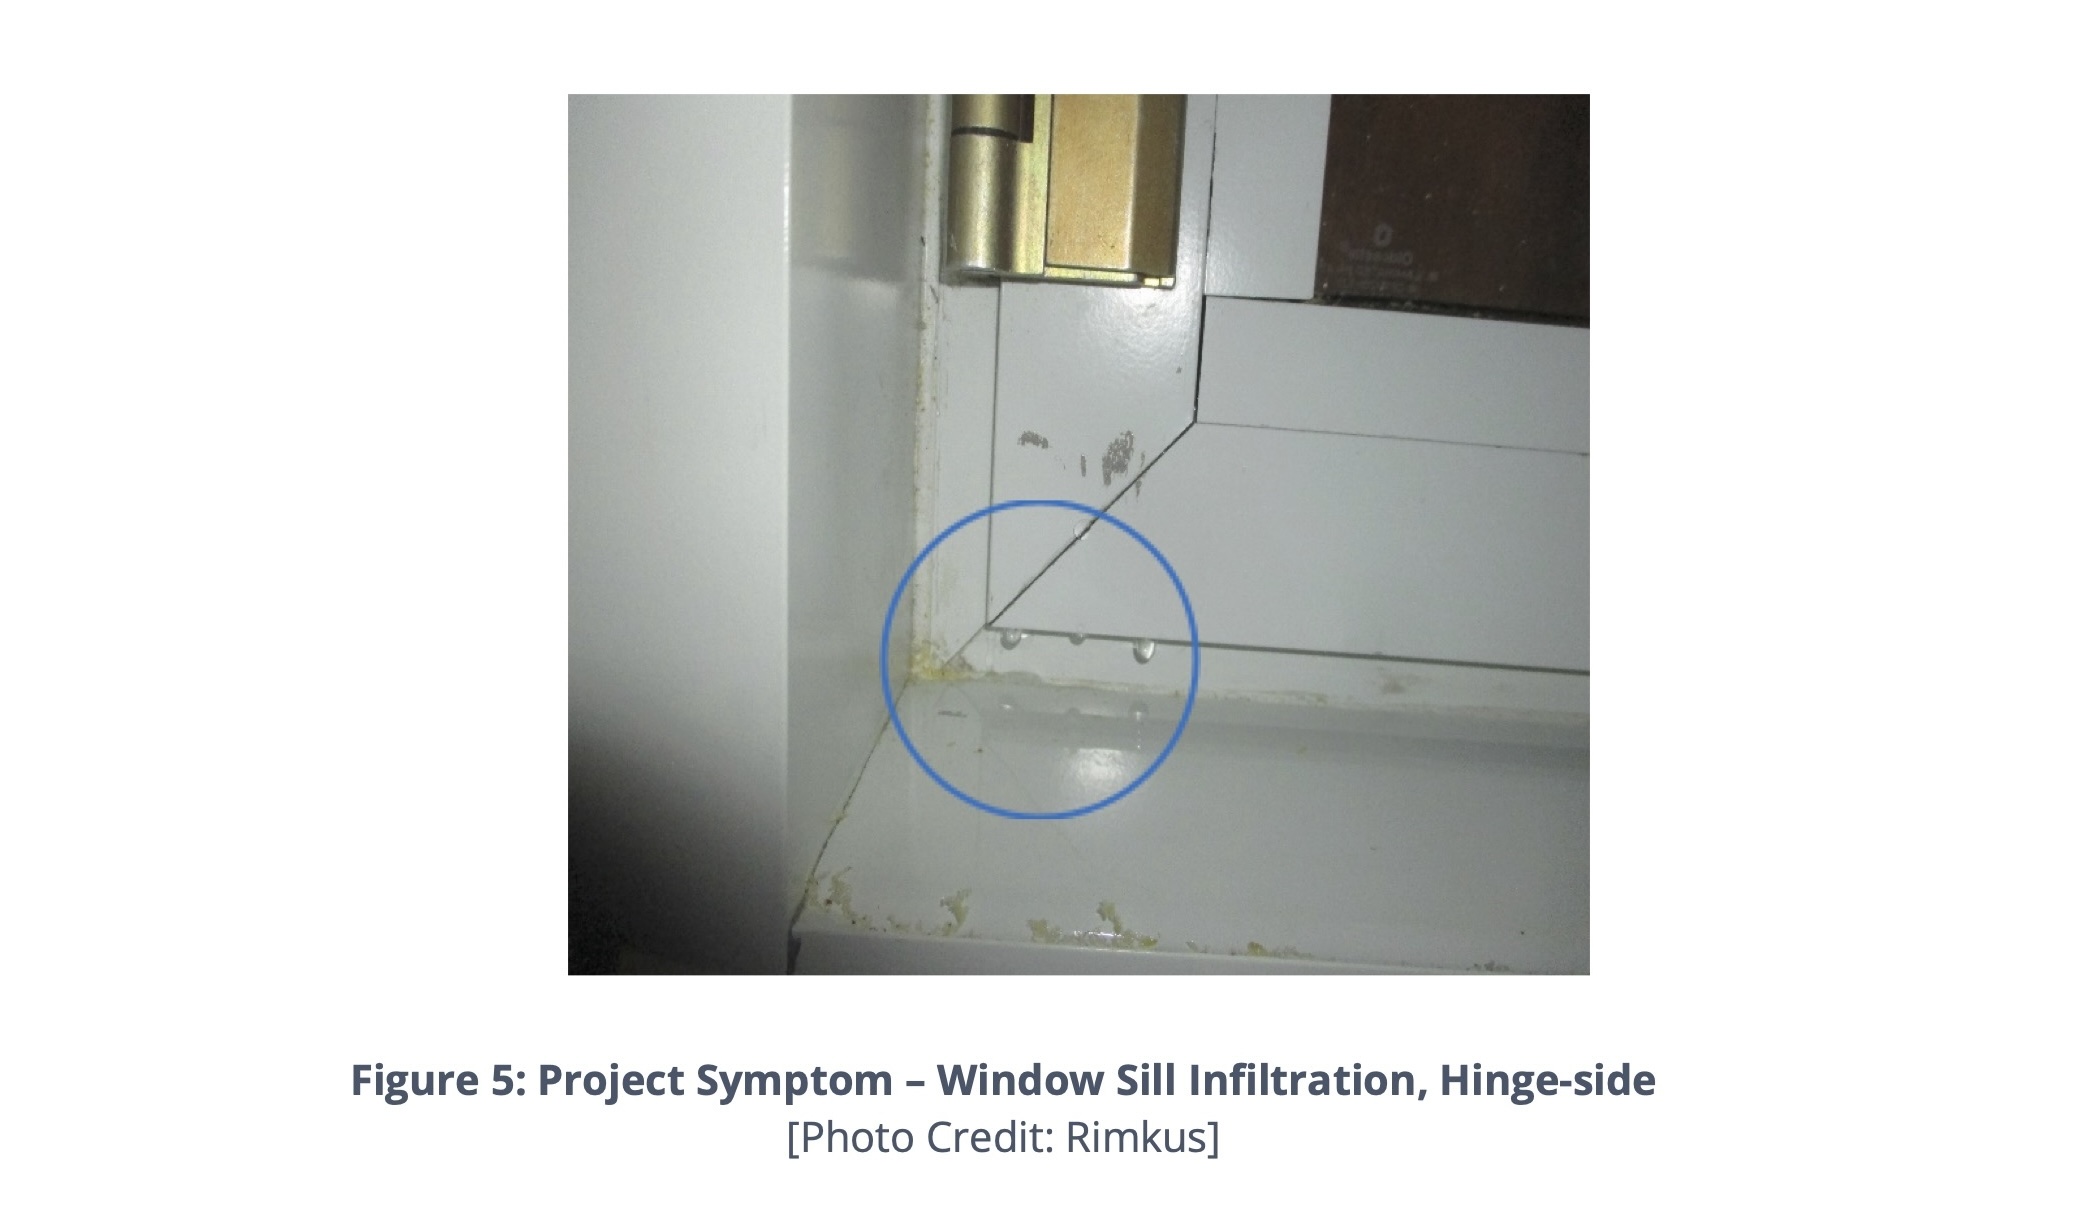
Poorly installed “heel beads” are often the result of leakage through interior compression gaskets, glazing attachments, and operable vent sash perimeters, and can lead to premature deterioration of laminated and insulating glass. The “heel bead” refers to glazing sealant applied at the inboard perimeter of an IGU and its position relative to the face of the glass and outboard perimeter or “toe bead.” Defects in the heel bead will allow water penetration into the snap-on interior glazing bead (snap-on cover) and that often results in leakage through the operable sash corner interior assembly joints (Figure 4).
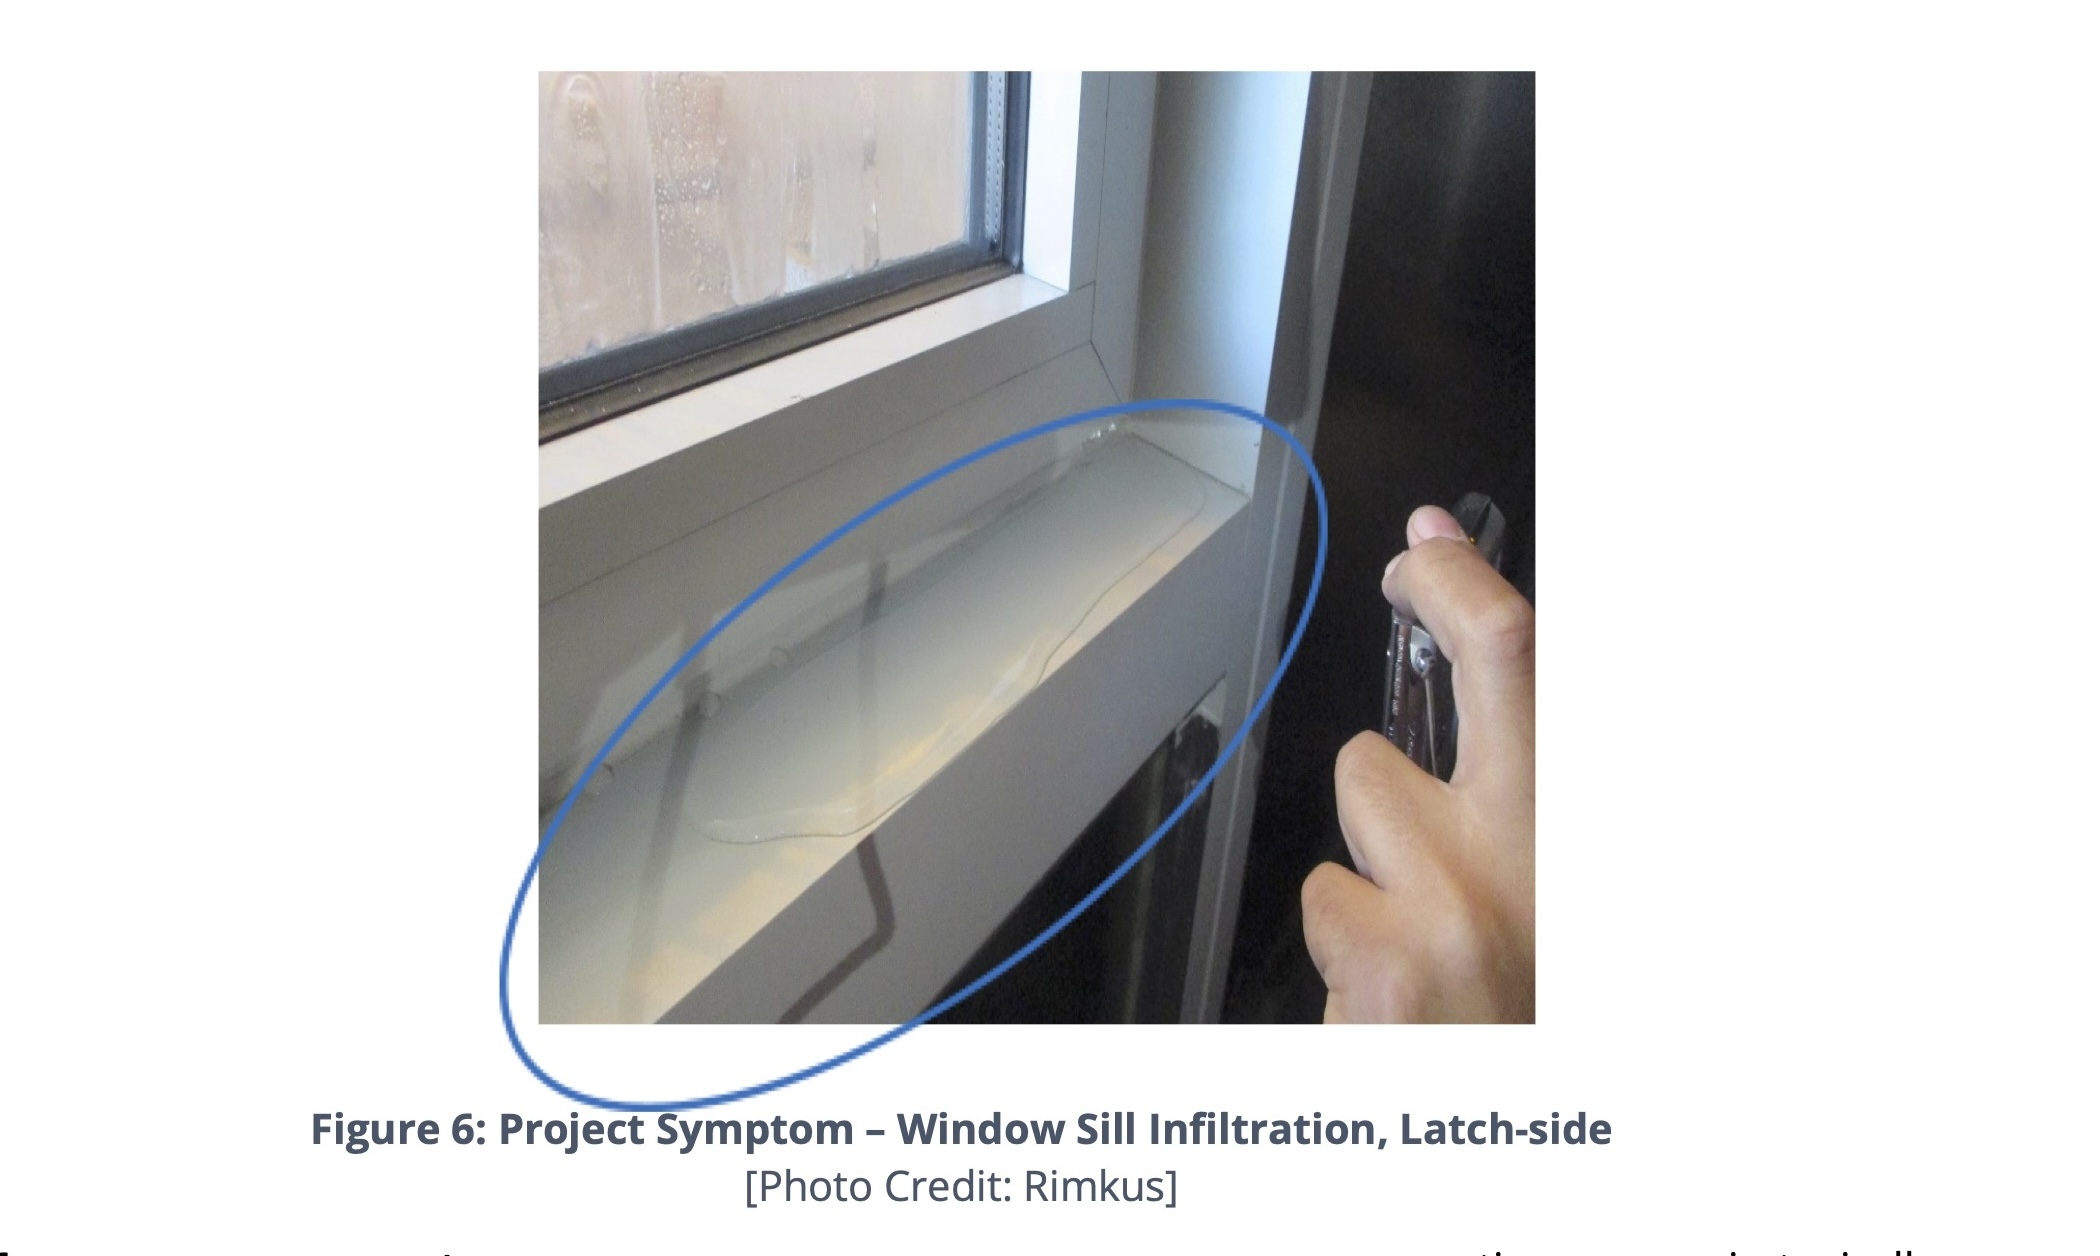
Latches, locks, and hinge/pivot hardware for operable vents should be properly adjusted and checked to ensure the compression of perimeter weather-barrier gaskets is adequate. Leaks often occur at operable vents due to improper adjustment of the window hardware and locking mechanisms during installation resulting in improper compression of the sash perimeter weather gaskets. Also, many buildings do not perform annual maintenance on the operable vents within the curtain wall assembly. This leads to misalignment of operable vents within the curtain wall frame, deterioration of perimeter weather gaskets, and inadequate compression of locking mechanisms (Figure 6).
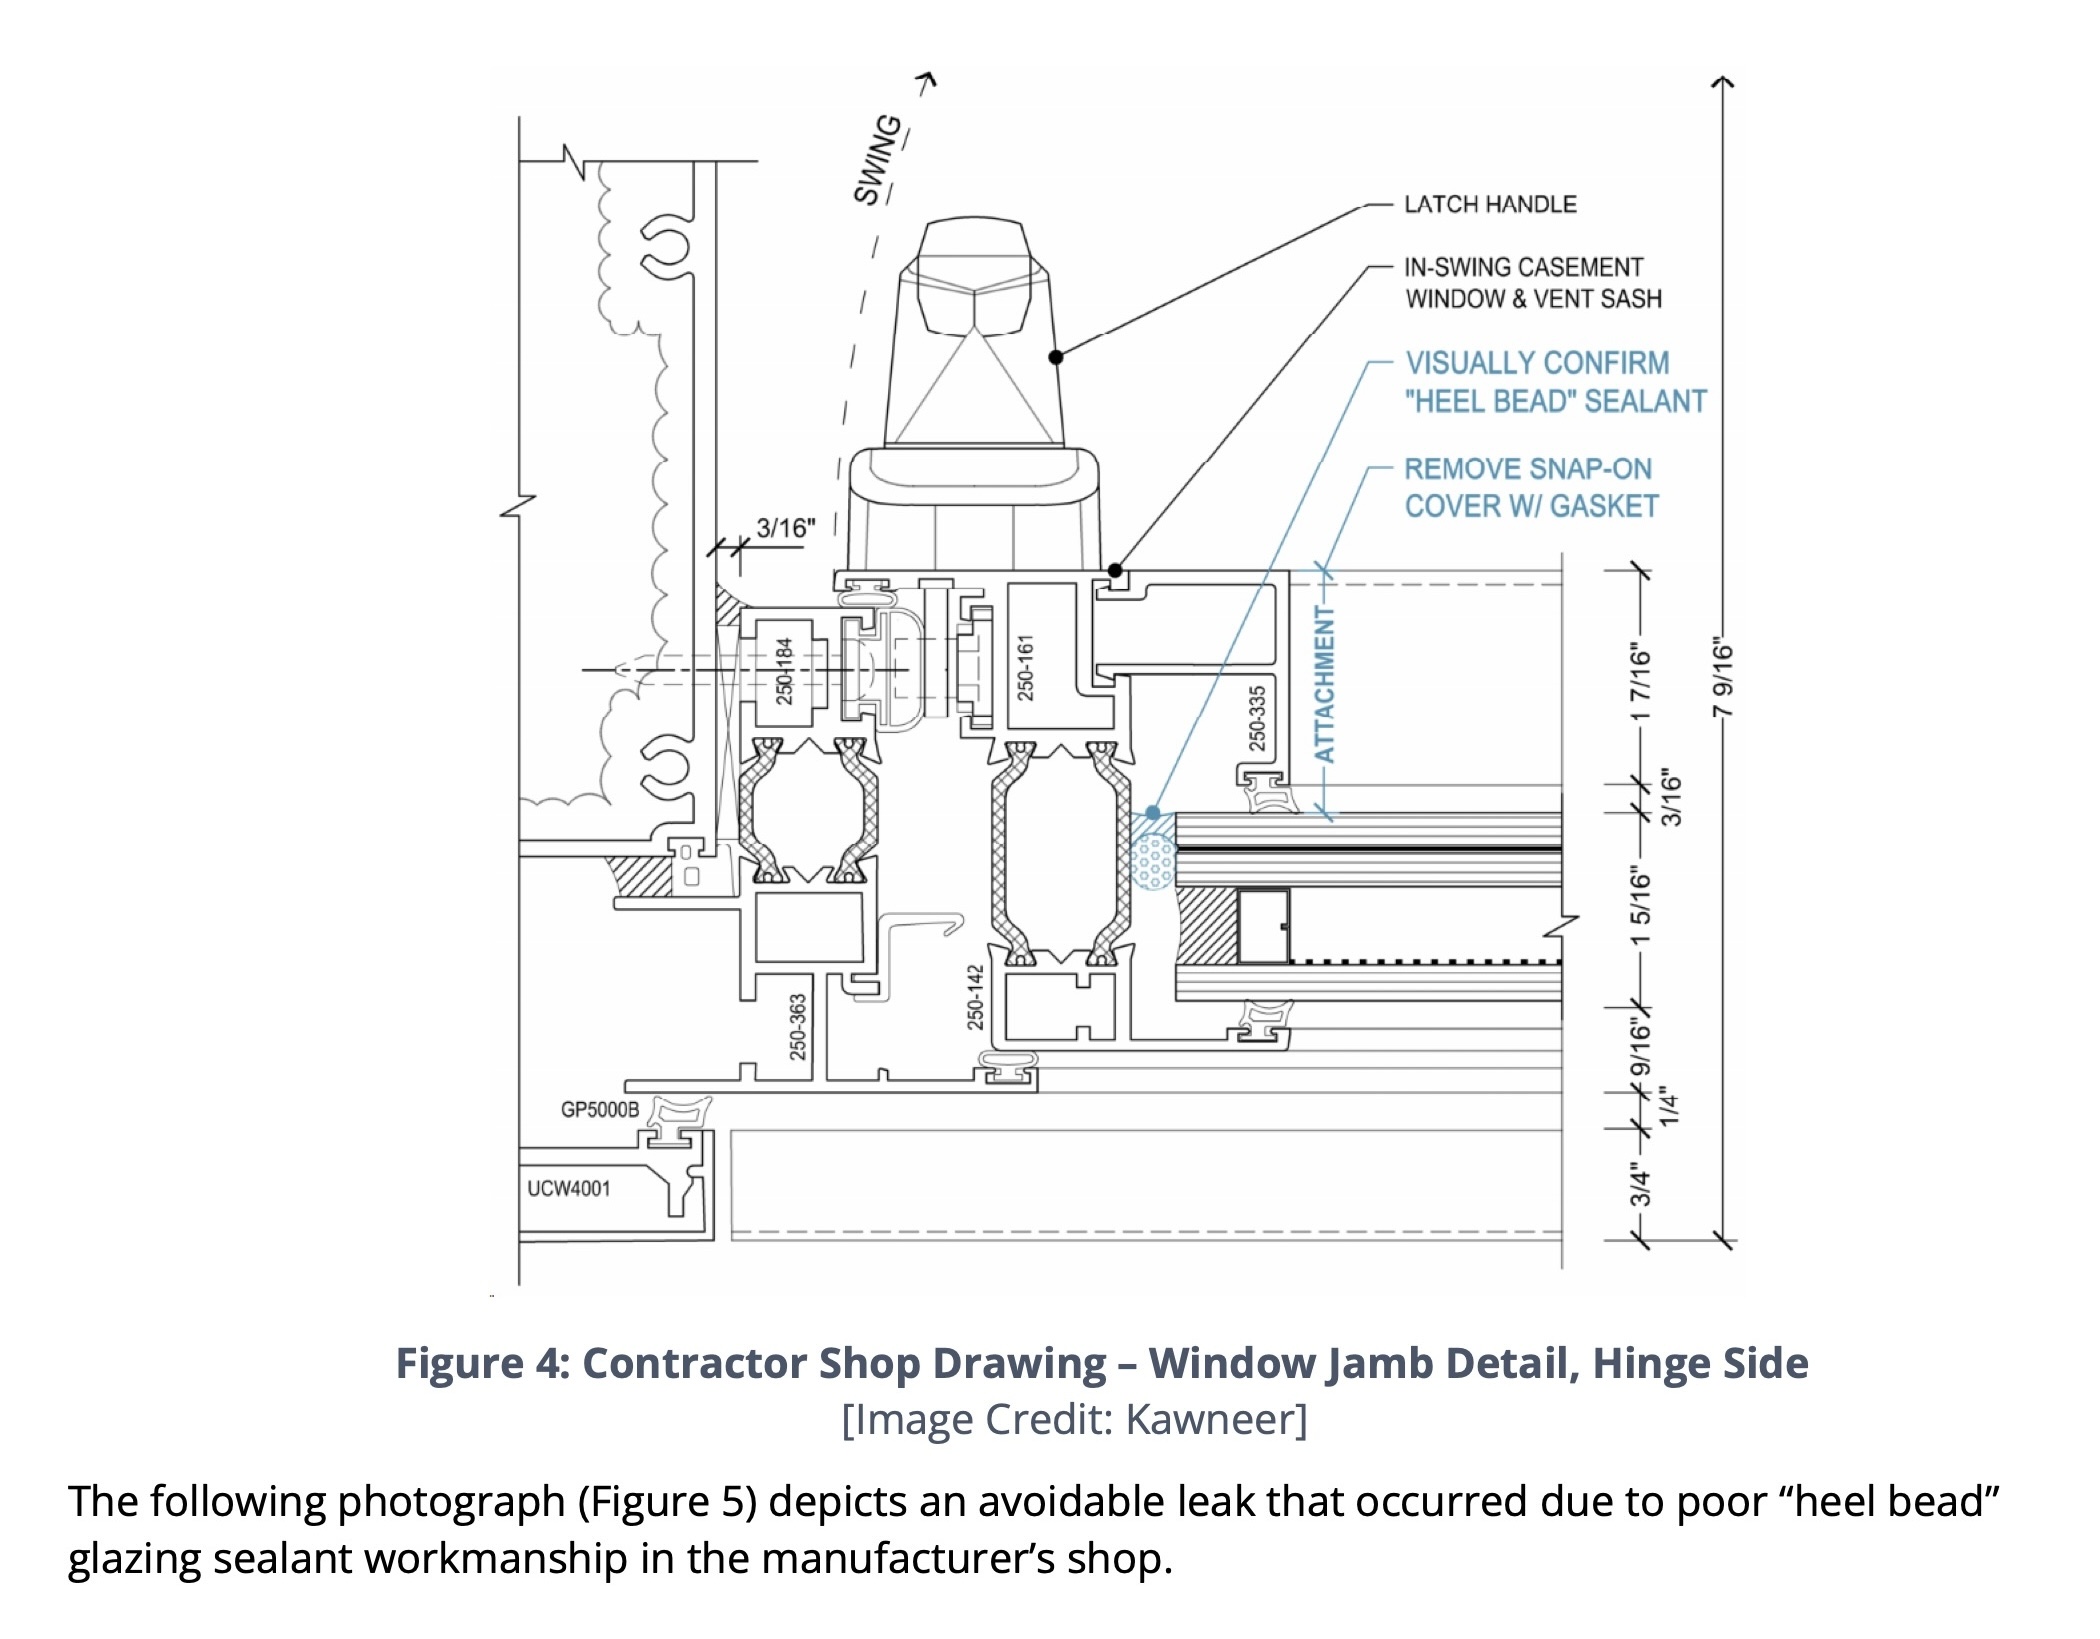
The following photograph (Figure 5) depicts an avoidable leak that occurred due to poor “heel bead” glazing sealant workmanship in the manufacturer’s shop.
The following photograph (Figure 6) shows avoidable leakage that occurred due to improper adjustment of the pivot hinge and the locking mechanism on the opposite side of the window. Adjusting all components and visually confirming the compression and continuity of perimeter weather-barrier gaskets attached to the operable window sash resolved the issue.
6. Probes of adjacent components
Implementing global repair/restoration scopes is typically impractical without performing some form of exploratory disassembly or local probing to diagnose and define the extent of necessary remedial work. Consider whether any further testing scope, such as performing non-destructive dynamic/static air and water tests, will recreate the service conditions necessary to evaluate specific hypotheses about the origin(s) of the observed leakage conditions. Consider also whether any adjacent exterior wall and/or roofing assemblies may be contributing to the leakage conditions.
7. Test in-place mock-ups before implementing each curtain wall repair type
Once potential causes for each failure mode or leak type have been established, designate field specimens as needed to test each proposed repair method and demonstrate its efficacy in place. Develop clear pass/fail criteria for all testing to confirm efficacy of remedial details, material and product compatibility, and establish clear workmanship benchmark references for all remedial work.
It is common for significant curtain wall leakage to involve multiple variables and migrate or present itself at different locations within the assembly due to the interconnectivity of internal cavities, glazing pockets, and other drainage channels. Therefore, a comprehensive multi-faceted investigation is required to determine the origin(s) of leakage. This requires determining whether manufacturer or installation deficiencies (or both) are the root cause of leakage, and that will establish the remedial scope of work necessary to resolve existing deficiencies.
About the Authors
Richard Aeck is a Registered Architect and Principal Building Envelope Consultant at Rimkus with extensive glazing and cladding system design experience for adaptive re-use, cultural, government, higher-education, infrastructure, preservation, and restoration projects. Notable contributions include developing, modeling, and detailing the Harvard Art Museum 'Light Machine' sloped façades and serving as Envelope Consultant on the Columbia University ‘Forum’, 529 Broadway ‘Nike Store’ in SoHo, ‘Montgomery County Justice Center’ in Philadelphia, and USDOT Volpe ‘Transportation Systems Center’ in Cambridge.
John A. Rudisill is a building enclosure consultant with 25 years of investigation, design review, and construction administration/QC inspection experience within the AEC industry. As a Practice Leader within the Built Environment Solutions group for Rimkus, a leading global engineering and consulting firm, he provides consulting services to a wide range of clients, with a focus on new construction, recladding of existing structures, building repositioning, and repair/renovation of existing building enclosure systems.
Related Stories
Products and Materials | Sep 30, 2024
Top building products for September 2024
BD+C Editors break down September's top 15 building products, from the Crystal W50i to Armstrong's DesignStackz Ceiling System.
Smart Buildings | Jul 25, 2024
A Swiss startup devises an intelligent photovoltaic façade that tracks and moves with the sun
Zurich Soft Robotics says Solskin can reduce building energy consumption by up to 80% while producing up to 40% more electricity than comparable façade systems.
Great Solutions | Jul 23, 2024
41 Great Solutions for architects, engineers, and contractors
AI ChatBots, ambient computing, floating MRIs, low-carbon cement, sunshine on demand, next-generation top-down construction. These and 35 other innovations make up our 2024 Great Solutions Report, which highlights fresh ideas and innovations from leading architecture, engineering, and construction firms.
75 Top Building Products | Apr 22, 2024
Enter today! BD+C's 75 Top Building Products for 2024
BD+C editors are now accepting submissions for the annual 75 Top Building Products awards. The winners will be featured in the November/December 2024 issue of Building Design+Construction.
75 Top Building Products | Dec 13, 2023
75 top building products for 2023
From a bladeless rooftop wind energy system, to a troffer light fixture with built-in continuous visible light disinfection, innovation is plentiful in Building Design+Construction's annual 75 Top Products report.
Products and Materials | Oct 31, 2023
Top building products for October 2023
BD+C Editors break down 15 of the top building products this month, from structural round timber to air handling units.
Building Materials | Jun 14, 2023
Construction input prices fall 0.6% in May 2023
Construction input prices fell 0.6% in May compared to the previous month, according to an Associated Builders and Contractors analysis of the U.S. Bureau of Labor Statistics’ Producer Price Index data released today. Nonresidential construction input prices declined 0.5% for the month.
Cladding and Facade Systems | Jun 5, 2023
27 important questions about façade leakage
Walter P Moore’s Darek Brandt discusses the key questions building owners and property managers should be asking to determine the health of their building's façade.
Design Innovation Report | Apr 27, 2023
BD+C's 2023 Design Innovation Report
Building Design+Construction’s Design Innovation Report presents projects, spaces, and initiatives—and the AEC professionals behind them—that push the boundaries of building design. This year, we feature four novel projects and one building science innovation.


